[nSign] Tomcat Upgrade Guide for Windows
1 Download latest version of Apache Tomcat
Select 32-bit/64-bit Windows
Service Installer
Select 32-bit/64-bit Windows
Service Installer
Transfer Installer into Windows
Server Hosting Netrust Application

Transfer Installer into Windows
Server Hosting Netrust Application
2. Tomcat Upgrade
2.1. Files and Configuration Backup
Create a folder ‘<Netrust Application>-backup-<date
in YYYYMMDD>’ in backup folder (e.g.
C:\Netrust\backups\nsign-backup-20210721)

Copy entire existing Apache Tomcat
folder and paste into this location (e.g. existing Apache Tomcat folder is
C:\Netrust\Tomcat 9.0_nSignv3)
Create a folder ‘<Netrust Application>-backup-<date in YYYYMMDD>’ in backup folder (e.g.
C:\Netrust\backups\nsign-backup-20210721)
Copy entire existing Apache Tomcat
folder and paste into this location (e.g. existing Apache Tomcat folder is
C:\Netrust\Tomcat 9.0_nSignv3)
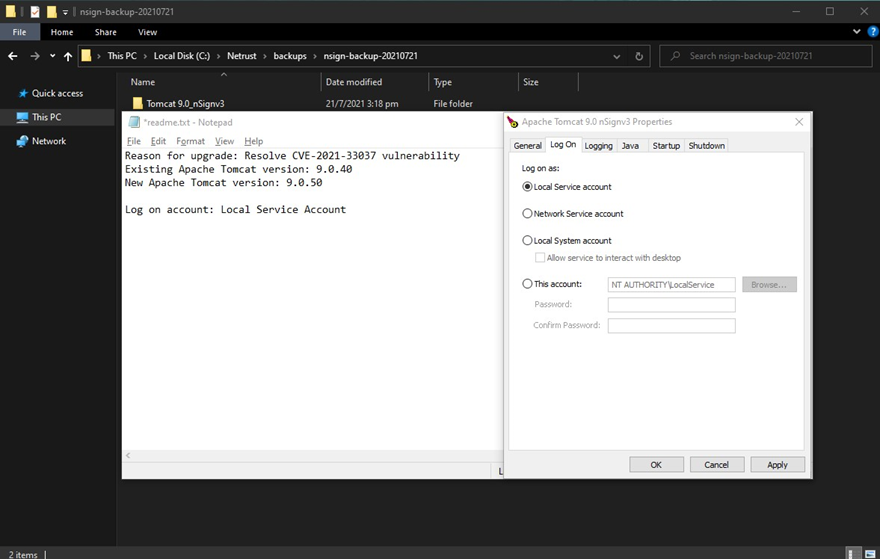
Create readme.txt and write ‘Reason for upgrade’, ‘Existing
Apache Tomcat version’, ‘New Apache
Tomcat version’
Create readme.txt and write ‘Reason for upgrade’, ‘Existing Apache Tomcat version’, ‘New Apache
Tomcat version’
In existing Apache Tomcat’s bin
folder, double click ‘nSignv3-<version>w.exe’
In existing Apache Tomcat’s bin
folder, double click ‘nSignv3-<version>w.exe’
Under ‘Log on’ tab, take note of
account used for log on and paste contents into readme.txt
Under ‘Java’ tab, copy contents in
‘Java Virtual Machine’ and paste into readme.txt (exclude
\jre\bin\server\jvm.dll)
Under ‘Log on’ tab, take note of account used for log on and paste contents into readme.txt
Under ‘Java’ tab, copy contents in ‘Java Virtual Machine’ and paste into readme.txt (exclude
\jre\bin\server\jvm.dll)
Under ‘Java’ Tab, copy contents in
‘Initial memory pool’, ‘Maximum memory pool’, and ‘Thread stack size’ and paste
into readme.txt
Under ‘Java’ Tab, copy contents in
‘Initial memory pool’, ‘Maximum memory pool’, and ‘Thread stack size’ and paste
into readme.txt
2.2. Stop and Disable Existing Apache Tomcat
In existing Apache Tomcat’s bin
folder, double click ‘nSignv3-<version>w.exe’
Click ‘Stop’ and ensure ‘Service
status’ changes to ‘Stopped’
Change ‘Startup type’ to
‘Disabled’
Unselect all items, select
‘Native’, click ‘Next >’
Update service name to
‘nSignv3-<Apache Tomcat Version>’, click ‘Next >’ (e.g.
nSignv3-9.0.50)
Replace Java path with Java used in existing Apache
Tomcat, click ‘Next >’ (e.g. C:\Program Files\Java\jdk1.8.0_202)
Copy path starting from ‘Tomcat’
(e.g. Tomcat 9.0_nSignv3-9.0.50)
Change path to the same path as
existing Apache Tomcat (e.g. C:\Netrust\) and paste folder name (e.g. Tomcat
9.0_nSignv3-9.0.50), click ‘Install’
Unselect ‘Run Apache Tomcat’ and
‘Show Readme’, click ‘Finish’
2.4. Configure Apache Tomcat
Open Apache Tomcat folder in
Windows Explorer (e.g. C:\Netrust\Tomcat 9.0_nSignv3-9.0.50)
Delete all Contents in Apache
Tomcat’s webapps folder
Copy contents of from existing
Apache Tomcat ‘\webapps’ folder and paste into Apache Tomcat’s webapps folder
(e.g. C:\Netrust\Tomcat 9.0_nSignv3-9.0.50/webapps)
Open file ‘\webapps\nSignDispatcher\WEB-INF\classes\application.properties’
in Apache Tomcat folder and locate nSignMain.authXmlPath
Update Apache Tomcat path to
Apache Tomcat Folder (e.g. from ‘C:/Netrust/Tomcat 9.0_nSignv3’ to
‘C:/Netrust/Tomcat 9.0_nSignv3-9.0.50’), save and close file
Copy existing Apache Tomcat
‘\conf\server.xml’ file and paste into Apache Tomcat’s conf folder (e.g.
C:\Netrust\Tomcat 9.0_nSignv3-9.0.50\conf)
If existing Apache Tomcat’s
‘\conf’ folder contains Personal Information Exchange (.pfx) files, copy
existing Apache Tomcat ‘\conf\*.pfx’ files and paste into Apache Tomcat’s conf
folder (e.g. C:\Netrust\Tomcat 9.0_nSignv3-9.0.50\conf)
If existing Apache Tomcat’s ‘\bin’ folder contains file ‘sqljdbc_auth.dll’, copy existing Apache Tomcat’s
‘\bin\sqljdbc_auth.dll’ file and
paste into Apache Tomcat’s bin folder (e.g. C:\Netrust\Tomcat
9.0_nSignv3-9.0.50\bin)
Double click
nSignv3-<version>w.exe (e.g.
nSignv3-9.0.50w.exe)
Change ‘Startup type’ to
‘Automatic (Delayed Start)’
Under ‘Log on’ tab, change ‘Log on as’ to match the ‘Log on as’ tab of existing Apache Tomcat (for accounts, input the correct password)
Under the ‘General’ tab, click
‘Start’ and ensure ‘Service Status’ updates to ‘Started’
Related Articles
nSign Desktop Upgrade Guide
Step 1. Start up the installed instance of nSign Desktop. Step 2: Click on 'Help' and 'About' to check the current version of nSign Desktop. Step 3: Take note of the Version number of nSign Desktop highlighted in red below. The version in this case ...[SAM] Tomcat Upgrade Guide for Windows
1 Download latest version of Apache Tomcat Select 32-bit/64-bit Windows Service Installer Transfer Installer into Windows Server Hosting Netrust Application 2. Tomcat Upgrade 2.1. Files and Configuration Backup Create a folder ‘<Netrust ...Verifying nSign Tomcat service status
1) Select the Search icon on taskbar, key in Services and press enter 2) Ensure that the status of nSign Tomcat Service is "Running"nSign Desktop Troubleshooting Guide (STAGING)
Login failed, unable to locate a digital identity. Upon encountering this error - 'Login failed, unable to locate a digital identity', 1. Download the following certificate files, Netrust Test CA2 and Netrust Test CA2-1 and save them somewhere ...nSign Desktop troubleshoot with Windows Security prompt
Certificate Entry Check 1. Open Microsoft Edge or IE, navigate to Settings and search for Manage certificates 2. Click on Manage certificates, a list of certificates should appear. Check that when the USB token is plugged in, the certificates issued ...